Soil Identification for Horizontal Geo Loops

Tuesday, April 18, 2017

Soil identification can serve as one of the largest obstacles to generating an accurate horizontal loop design. That’s because it plays a large part in determining how many trenches are needed and how long they need to be. While it may sound simple, soil identification isn’t an area that most people are formally trained in.

Soil Properties

To design a horizontally-trenched loopfield, the important soil properties - thermal conductivity and thermal diffusivity - need to be quantified. These properties are dependent on three primary factors:

  • Soil type
  • Moisture content
  • Density

As described in this article, it is generally best to be conservative and assume that both density and moisture content are average to below average, unless you have enough information to justify a different assumption. Beyond that, soil type is the only factor left to define, which is where your homework begins.

Possible Resources

There are a number of resources to help determine soil type at the job site. County soil maps, soil survey reports and geotechnical reports may serve as a decent starting point in your search. Local excavation contractors that provide services such as septic tank installation may be able to provide firsthand knowledge of the soil type in an area as well.

Possibly the best, most accessible source of information is the USDA’s Web Soil Survey (WSS).

Using Web Soil Survey

WSS is a free online service that provides access to soil data collected by the National Cooperative Soil Survey, and is very easy to use. Soil identification is done in three simple steps:

  1. Enter the project location. WSS accepts many different forms of input for location - address, latitude and longitude, Public Land Survey System (PLSS) coordinates, etc.
  2. With the correct location shown on the map, simply zoom to the area where the loopfield is to be located and draw a box to create an Area of Interest (AOI).
  3. View soil type(s) in the AOI.

Once the AOI has been successfully created, WSS provides a free pdf download of the soil report, which includes:

  • Soil map with legend
  • Detailed description of the soil types along with the occurrence level for each (expressed as a percentage)

To download the report, simply click on the “Shopping Cart” tab, name the report, choose the options in Table of Contents, and click Check Out to begin the download process.

Try an Example

For example, our office is located at 302 E. Warehouse St., Elkton, SD 57026. Enter this in the search box, zoom in to create an AOI as shown:
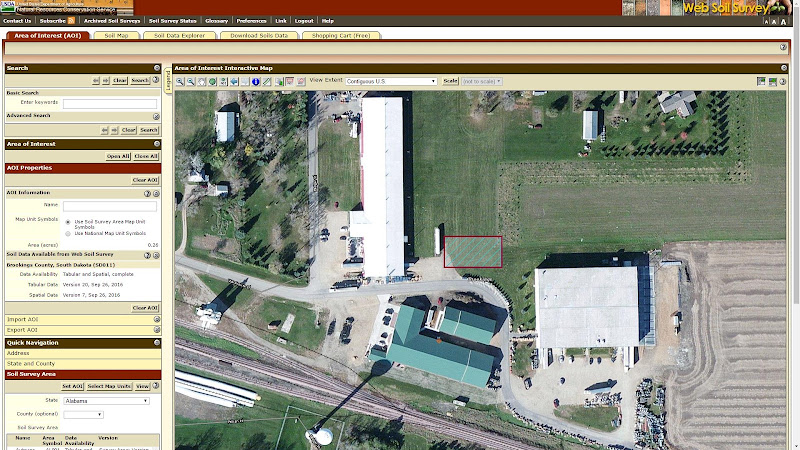
Once the AOI has been defined, the ‘Soil Map’ link will show a detailed map of the soil types in the area. For this example, the predominant soil type in the area is Silty Clay Loam (Z181A - Brandt)
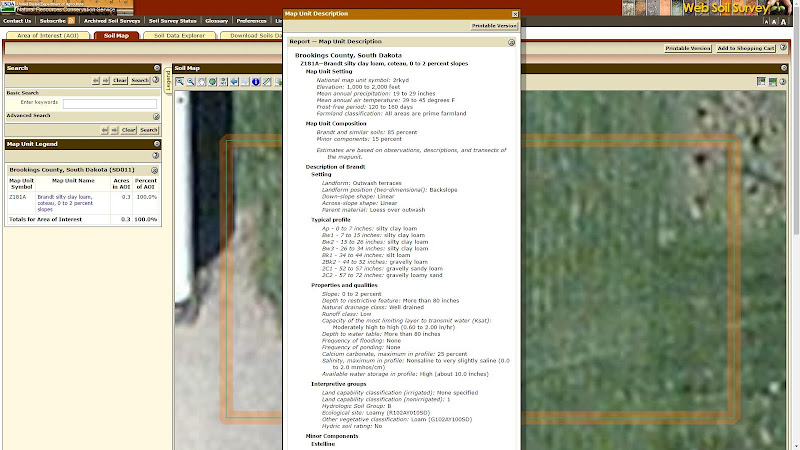
Click here to download the sample report for this example.

Soil Identification in LoopLink RLC

Once you have identified the soil type in your area, assigning soil properties in LoopLink RLC is relatively easy:

  1. Assign soil density level (low, average, high)
  2. Assign soil moisture content (dry, typical, wet)
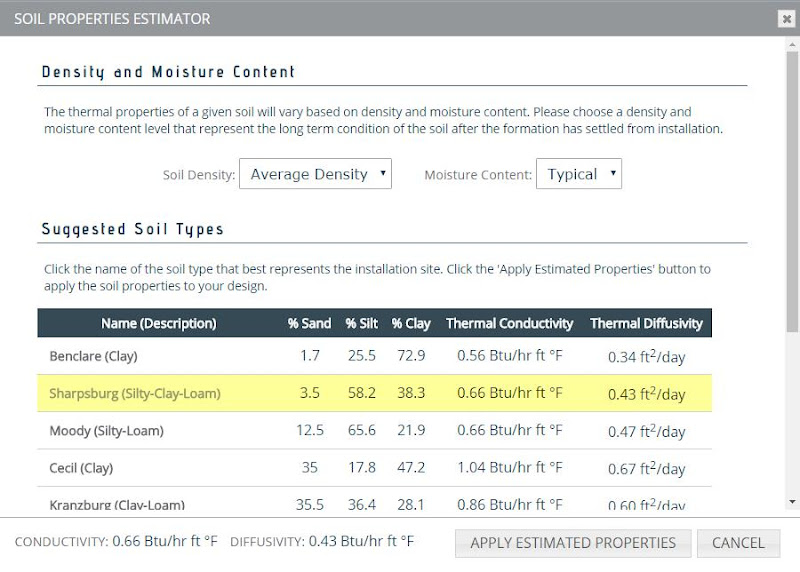
  3. Find a similar soil type in the Soil Estimator

In general, leave the selection for moisture content and density level at the default settings unless better information is available (i.e. a geotechnical report is available and provides enough detail to justify a change). From there, simply choose the soil type that most closely matches the soil identified in WSS. When making your choice, focus on the description in the table (clay, silty-loam, etc.).

Once you’ve made your selection, LoopLink RLC will provide recommendations for soil thermal conductivity and thermal diffusivity and you can proceed with the horizontally-trenched loop design.
Although soil identification can be intimidating (especially to the new designer), it is vital to accurate loop design. USDA’s Web Soil Survey breaks down this barrier. The service is easy to use and best of all, it’s free!

Understanding Auto-Header

Tuesday, March 7, 2017

In LoopLink PRO we spent a lot of time on header design. We spent so much time on it in fact, most users will never need to spend more than a few seconds on the page. But the speed with which the auto-header function does its job, belies the complexity and importance of what it is doing.

This article describes generally how the LoopLink PRO auto-header system works so it feels less magical and becomes more useful.

Fixed Assumptions

In order to automate the design of your loopfield headers, the LoopLink PRO auto-header tool was built using three fundamental assumptions.

  • Headers are broken into evenly-sized groups of bores we call circuits.
  • Circuits are designed using step-down, step-up reverse-return principles (SDSU-RR).
  • Regardless of u-bend material being used, the header pipe is constructed using HDPE.

We arrived at these assumptions through our own experience and by reviewing hundreds of header designs from other engineers and system designers. From our research, we have found that this method of piping design is the most common and least error prone.

Basic Logic

With those assumptions set, the auto-header function follows a pretty simple set of rules based on IGSHPA's Design & Installation Standards and supplemented by best practices. The scope of the problem is bounded first by the pipe sizes you select to include. After that, we simply analyze the theoretical velocity and pressure drop through a section of pipe and make a choice as to which pipe diameter makes the most sense to minimize head loss while maintaining the minimum velocity required for the flushing process.

You Choose the Available Pipes

The smallest pipe size available is always the diameter and dimension ratio of your U-Bend selection. When your header is initially designed, LoopLink PRO will by default use the same dimension ratio as your U-Bend selection for all sizes of pipe. After that, you can select the nominal diameter and dimension ratio pipe you would like to include in your design.

So, if for example you wanted to design headers to skip 1.25” pipe, all you would do is turn off 1.25”. If you want everything larger than 2” to be DR 13.5… turn those pipes on.

LoopLink PRO will only design your headers using the pipe sizes you specify.

When to Step

LoopLink PRO is designed to first minimize head loss then maintain minimum flushing flow velocities. The minimum flushing flow velocity is defaulted to 2ft/s based on IGSHPA's Design & Installation Standards. That said, you can easily override this value if specified by local code or as a matter of professional preference.

LoopLink PRO will first determine the smallest available pipe size that will result in a head loss value that is less than 3 ft. H2O per 100 ft. of pipe length but is still capable of maintaining the minimum flushing velocity specified in that section.

At every intersection where the header will ‘feed’ a loop, the loop’s design flow is subtracted from the total flow required to provide design flow to the last bore in a circuit. The auto-header then decides if the next section of pipe should be the same size as the last or if a diameter change is needed to minimize head loss and maintain flushing velocity.

The process is exactly what you would do if you were solving the header on paper… just faster and with a lot less eraser debris on your desk.

You Can Step In

LoopLink PRO does its best to behave like we do during header design but it isn’t always practical or reasonable to program common sense choices that fall outside of design standards. Sometimes an engineer needs to step in and apply their experience. Which is why we included manual edit mode.


This allows you to start with an excellent base header configuration and quickly apply changes to make the design your own. The system will even warn you if you fall outside of the standards and provide you with feedback that will help you choose if the decision is appropriate.

The auto-header isn’t meant to take the designer out of the equation. It is meant to take the tedium out of your design process so that you can iterate and optimize quickly to find the best solution for your application.

LoopLink RLC Update: Economics of Replacing an Old GSHP

Thursday, February 2, 2017

LoopLink RLC now allows for an economic analysis to be performed that compares a new GSHP to an old one that is ready for replacement. By doing so, we allow the system designer to illustrate the benefits of upgrading to a new GSHP unit from an economic point of view.

Why The Update?

Units that were installed in the 80's and 90's are most likely near the end of their 25-30 year life expectancy. If you couple that with the fact that newer GSHP units are quieter, more reliable, and more efficient than they were 20-30 years ago, you may find yourself on the receiving end of sales contract to replace a unit.

Project Changes

The new option is included on the Operating Cost Summary and Cost of Ownership pages. To perform an economic analysis that includes the estimated operating cost and long term cost of ownership for an older GSHP, you must first check the box to activate the option from the Operating Cost Summary page.

The performance of the old equipment is described by the operating efficiency you specify just as it is for the other comparison technologies. If you have actual operating efficiency averages for the past year (there are homeowners that check) you should use that information. Otherwise, using the old rated efficiency should get you close.

The Annual Operating Cost by Technology and Annual Carbon Dioxide Emissions by Technology graphs will update accordingly as you make changes to the technologies to comare and their operating efficiencies.


After activating the option, you will also be able to perform a long term economic analysis on the Cost of Ownership page to show simple payback as well as long term operating and ownership costs.

LoopLink RLC Update: Account for Fixed Costs

Monday, January 30, 2017


The original article has been updated to include information about natural gas meter costs which was added two days after the original post on February 1, 2017.

In our latest update to LoopLink RLC, we added the ability for the system designer to account for the fixed recurring annual cost for natural gas meters or to rent,lease and/or maintain a propane or fuel oil tank. By doing so, we allow for more accurate economic comparisons between those heating systems and a GSHP.

Why The Update?

Tank rental is common among homeowners that prefer to avoid the upfront cost of purchasing a propane or fuel oil storage tank. Additionally, a homeowner may opt to rent rather than own so they do not need to worry about the costs for maintenance, re-qualification or repair. In such cases, the cost to rent a tank needs to be included in the overall operating cost for a propane or fuel oil fired heating system. In the case of natural gas systems, meter fees are frequently a part of the total cost and can add up over time.

Project Changes

The new fields are located on the Price & Inflation Rates page. For existing projects (or projects where fixed costs do not apply), the default value has been set to zero. Note that the field asks for fixed costs in dollars spent per year ($/year).

Operating Cost Summary Changes

To keep our numbers as transparent as possible, the operating cost comparison table will automatically display the new information in a separate “Fixed Cost” column (when applicable). The cost will automatically be wrapped into the graph.

Report Changes

Fixed costs are reported on the Prices & Inflation Rates report page. To make room for the new fields, the reporting of system efficiencies was moved to a separate page. As has always been the case, the inclusion of these pages in the pdf report is optional.

LoopLink RLC Update | Variable Capacity Equipment

Thursday, June 23, 2016


Our latest round of LoopLink RLC updates is focused on the zone and equipment selection options. You can now select variable speed circulators, model variable capacity equipment more realistically and select to use no supplemental heating.

Variable Speed Circulators

Assigning a variable speed circulator allows the system to ramp up and down the amount of flow that is being pushed across the coil and through the ground loop to maintain the target delta-T. For some dual capacity units there is an additional control option that allows you to specify discreet flow rates for high and low capacity operation. By default, RLC assumes the more common control over delta-T.

Variable Capacity Heat Pumps

We additionally implemented full support of variable capacity heat pumps. The equipment has been in the system for some time however, we treated it as dual capacity equipment. Projects in the system that used the original method of variable capacity equipment treated as dual capacity remain untouched. The heat pumps have just been flagged as outdated.

If you would like to go back into your old projects and update them to use a truly variable capacity model, simply open the zones and re-select your equipment.

No Supplemental

There are cases where designers have no intent of using a strip heater or other form of supplemental heat for the system. If the heat pump is sized to 90% or greater in heating, there arguably shouldn’t be very many bin hours where the GSHP system is unable to maintain set point temperature. RLC now gives you the ability to turn off the supplemental so long as you have sufficient heating capacity assigned to the zone.

As a word of caution, just remember that systems without supplemental may have extended run times where the heat pump is simply unable to satisfy the call for heat. This isn’t necessarily a bad thing, but homeowners tend to like their thermostats satisfied.

GSE Power Up

Wednesday, June 22, 2016

GSE is the newest service in the LoopLink® family and it is one we are very excited to have available. If you aren't familiar with LoopLink GSE, it is a web service for companies in the residential geothermal market that estimates the how much a homeowner could save if they switched to geothermal.

Since this is the first GSE update article, you should note the majority of updates and news we report about GSE will be written more for web-developers than our typical audience of geothermal system designers. We will do our best to keep the nerd lingo to a minimum and include information that is of universal interest.

With the basics out of the way, lets talk about what we have been up to.

Units of Energy

You can now access the total number of units of fuel consumed in an operating mode (heating, cooling, hot water) both annually and monthly. In other words, you can report the number of kWh the heat pump consumes in a year for heating as compared to the number of ccf of natural gas the conventional furnace would use. This is handy if you want to apply your own methods for estimating energy rates after you receive your response. Of course, you could always pass that information to us and we will return your cost and savings.

Monthly Outputs

In the first iteration GSE was built to simply provide annual savings, cost and carbon emissions estimates. In our latest update we added the ability to access that information for every month of the year. This is really useful for generating graphs and charts that can really help in making your interface look professional and approachable.

Carbon Reduction

We added a 'reduction' object to the 'carbon' objects (annual and monthly). This is just a convenience addition that offers direct access to the change in carbon emissions from the conventional system to GSHP rather than requiring client side processing.

Backwards Compatible

We haven't discussed versioning since GSE is so new to us but we wanted to make a note that minor versions of the software will always be built to be backwards compatible. It is how we define our major vs minor versions. Simply put, in minor versions, we won't break your existing interface by dropping support for or changing the name of a key etc. We only expand on the existing response. Major versions may not be backwards compatible with your interfaces but when we get to that point, we establish a sunset policy for legacy version support.

LoopLink RLC- Pick Your Pipe

Wednesday, April 27, 2016


This week we introduced the ability to choose between HDPE 3608, HDPE 4710 and PEX-A for loop piping in all ground loop configurations in LoopLink RLC.

You will notice on all of your old projects, that your pipe dimensions are held and that HDPE 3608 (standard issue in residential applications) is preselected. You can modify your materials and pipe sizes on old projects and new. All HDPE pipe sizes assume DR 11 while PEX-A is always DR-9.

Switching materials will properly account for the different resistive properties of HDPE vs. PEX-A. You will notice that HDPE 3608 and HDPE 4710 perform the same thermally. That is because there isn’t a resistive difference between the two. The difference between the two is that HDPE 4710 has a higher pressure rating. For DR11 at an assumed 74°F HDPE 4710 is rated at 200psi while HDPE 3608 is rated at 160psi. Note that PEX-A is also rated at 160psi at 74°F.

A Couple Little Things

As always there were some minor corrections and tweaks that we made in this update.
  1. We now filter comparison technologies in Cost of Ownership to match those selected in Operating Cost. This issue was brought up by a user who deselected all but one comparison option in Operating Cost and was then (understandably) confused as to why they had to choose a comparison technology on the Cost of Ownership page.
  2. Trench width values were not updating correctly on screen for horizontally trenched layouts with only one available option for trench width. The calculations were not impacted by this issue. The problem was strictly visual.
  3. When adding a Hot Water system to a project, it was possible to select ‘None’ for the hot water system type. The page still showed all of the input fields for an On-Demand design so, if you weren’t paying attention, you could generate an error on save. The page will no longer allow you to input data if ‘None’ is selected as the system type.
  4. Print summary checkbox labels are now toggling correctly if you use the Select/Deselect All option.

R.I.P. Deep Earth Temperature Map

Thursday, April 7, 2016

The Project Details page of LoopLink® RLC has just received an upgrade. You can now manually override the minimum and maximum outdoor air temperatures used in your design. Additionally, we created a new ‘Estimate Deep Earth Temp’ button which will apply an approximate Deep Earth Temperature to your project based on the specified Bin Data Location.

Manually Override OATs

This addition is for two types of users.

  1. Those that perform their system sizing calculations using non-ASHRAE weather conditions.
  2. Those required by local rebate providers to document designs at specific temperatures.

In either case, the use of manual values is pretty straight forward. Click the ‘Manually Override OATs’ button and the values assigned are what LoopLink® RLC will use in energy and performance modelling. The values are limited by the local weather data. That said, it is important that you understand the impact modifying these values has on your design before you use this feature.

Estimate Deep Earth Temp

As many users have noticed, the update to the interface included the removal of the Deep Earth Temperature map. Our reasons for doing this boil down to:

  1. The map was dependent on Flash Player and as this article from Wired explains, the internet is actively pursuing the death of Flash Player.
  2. The map had limited utility as compared to the simpler and more effective estimation button that we just added.

The estimate Deep Earth Temperature button is possibly too easy to use… click it and an estimated Deep Earth Temperature is calculated as a function of mean outdoor air temperature. For those performing Open Loop designs, water well temperature has the exact same functionality applied.

You can of course double check the value against the map which (in a non-interactive form) now lives in the help. If you have more accurate data from past experience or in-situ testing, the value can still be entered manually.

Shiny New LoopLink RLC

Friday, April 1, 2016


You may have noticed some pretty major changes to LoopLink® RLC this week like... everything is different. We released our updated interface and now that the dust is settled we wanted to take a little time to explain what we did and why.

The simple answer to the question of why we overhauled the interface is mobility and responsiveness. These have been the buzzwords in web design for the past few years and a trend we waited to follow until a significant number of our users began accessing the software from tablets and handheld devices.

The shift has begun and so we are supporting our user’s natural trend to use the device they have at hand. At the same time, updating the interface allowed us to do some important technical and visual things to simplify LoopLink® RLC and make it lighter weight with respect to data usage which means faster performance regardless of device.

In the end, we have a faster easier to use LoopLink® RLC that will better support new features and improvements as we move ahead.

Simplified Navigation

We stripped out the redundant navigation on the top of the page and moved everything to right hand side of the screen. This streamlines work flows and puts everybody on the same page during support calls.

Additionally, we largely (but not entirely) walked away from image based navigational cues and moved to text based buttons. The removal of iconography is intended to reduce ambiguity for new users and help facilitate faster load times by reducing the amount of data your computer needs to download to render the finished page.

There are a couple of major navigational changes that we should mention as they may be a little confusing for everyone the first time through.

  • You get back to your project list by clicking the logo in the top left of your screen.
  • Click on your initials in the top right corner of your screen to access links to account administration, project list or log out.
  • The save button is always going to be at the top of the page. As always, pressing enter will also save your changes if you are focused on an input.

Graphs

We completely changed how we create on-screen graphs. The new graphs are lighter weight, faster and interactive. You can now hover over points, slices and bars and read the value directly from the chart.

There are some minor visual differences between the graphs shown on-screen and those in the reports. The plotted data is the same, they just don’t match 100% (yet) because they are built by two very different methods.

Help

The help files have also been redesigned. In fact, we moved the help files to a completely different platform which will make maintenance and enhancement much easier to handle moving forward. The way you get to the help is the same but the new help will be easier to navigate on its own. Plus, it is now accessible without being logged in to your LoopLink® RLC account. Simply go to help.looplinkrlc.com.

Additional Changes

  • Horizontal trench designers, you should note that we no longer ask for the number of flow paths as an input. We ask for flow paths per trench/pit and number of trenches/pits. It is a subtle but important difference.
  • We lowered the fidelity of fixed length mode calculation from ±1 foot to ±5 feet. The result of this is a significant decrease in iterations for the system which means faster responses with a minimal impact on overall accuracy.
  • Soil tables are no longer directly accessible through the software. There has been a lot of confusion related to soil properties (especially for horizontal applications) as a result we moved the tables to the help files and are providing just our calculators in the software.
  • Cost of Ownership is now available for a variable time period (5-30 years) as opposed to a fixed 30 year analysis.


Soil Selection For Horizontally Trenched

Thursday, February 18, 2016

Soil selection has long been a sticking point for a lot of LoopLink® RLC users when designing a horizontally trenched system. For our first try at simplifying the process, we posted the soil selection table from the Residential & Light Commercial Design & Installation Manual. The table is admittedly a bit dense and we were asked to make things a little easier.

So we created, what we thought at the time, was a much simpler method of selecting a soil. We supplied drop downs for soil density and moisture content which filtered the table down to a single thermal conductivity and thermal diffusivity for each soil type. The user then adjusted a slider to define the soil composition. LoopLink® RLC found the closest matches from the table and returned at most three options to choose from.

It was that last part of the interface that seemed to over complicate things. We (I) may have been too interested in creating something neat to look at versus something that did its job well. So, this week we removed the last step. Now you select a soil density and a moisture content and we return the entire table of soil types with just one thermal conductivity and one thermal diffusivity for each.

With this change I thought it might be worth a review of why soil selection matters and generally how to go about it.

Why Soil Selection Matters

Selecting the correct soil for your horizontally trenched installation is important because it defines two key variables in the calculation of loop lengths—soil thermal conductivity and soil thermal diffusivity. Both variables are a function of soil composition, density and moisture content.

Soil Thermal Conductivity
How fast heat moves through the soil given a specific temperature difference.
Soil Thermal Diffusivity
The measure of how fast heat moves relative to the capacity of the soil to store heat.

Determining Soil Composition

Soil composition is the single most important component of soil identification and it is also the one that tends to be the most intimidating. There are hundred page books on soil classification systems or we can point you to a very simple and direct explanation from Colorado State University Extension.

The page is written with gardeners in mind but the concepts are universal. If you are after more depth, refer to the IGSHPA Soil & Rock Classification Field Manual. We do also cover this topic thoroughly in our IGSHPA Geothermal Installer Certification Training which we offer through HeatSpring.

Once you determine your soil composition, you need to determine its density and moisture content.

Determining Soil Density

The density of your soil as it relates to the tabled values in LoopLink® RLC is determined as a dry bulk density. To find the dry bulk density, you extract a known volume of soil using a bulk density soil sampling kit. Dry the sample completely and then divide the weight of the dry sample by the volume extracted.

Practically speaking, if the soil density test is skipped you should know that in general lower soil density tends to correlate with lower thermal conductivity and diffusivity. So assuming low density is more conservative.

Determining Moisture Content

For LoopLink RLC we have reduced the moisture content selection to values of dry, typical and wet. Where dry soil is at the wilting point, wet soil is at field capacity and typical soil is the average of the two.

To understand these terms a little better you should know that wilting point is the level of soil moisture at which plants can no longer draw water through their roots and thus begin wilting. Field capacity simply means that the soil can absorb absolutely no more water because it is saturated.

The dryer the soil the worse it will perform with respect to our thermal properties. It should be noted that unless it is known that droughts are prevalent or the formation has a tendency to dry out, it is rare that 6 feet down the soil will dry out to the wilting point. It can however be overly optimistic to assume that a soil will always be at field capacity.

You Can Look It Up

The USDA maintains very detailed soil maps for the entire United States. If you are unsure about your soil composition reach out to your county USDA office to get this information or look it up through the Web Soil Survey. A quick search of the internet should also result in a few other tools that will help you in your pursuit of determining the correct soil properties.

Introduction to LoopLink PRO

Tuesday, February 16, 2016


Introduction to LoopLink PRO presented by Doug Carruthers on Vimeo.

Learn about the features and basic navigation of LoopLink PRO commercial geothermal design software. This video is a recording of a webinar held on February 5th, 2016.

In the interest of time, participant questions during the presentation and the Q&A session from the end of the presentation have been redacted.


You can learn more about LoopLink PRO features or sign up for a free one week trial of LoopLink PRO at looplinkpro.com

Meet The LoopLink Family

Wednesday, January 27, 2016

In its first incarnation, LoopLink® was the name we put on our residential and light commercial geothermal design software. Over time, we thought up great services that were related to LoopLink® RLC but needed to be separately accessible because of who they would best serve.

Last year, 2015, became the year that we had to figure out how to deal with some of those ideas. More to the point, we had to figure out what to call them. We wrote lists and lists of names but none of them seemed to stand up. Maybe it was just how comfortable we were with the sound of 'LoopLink' but nothing else seemed to fit.

In the end, we decided to create some short term confusion and keep LoopLink as the family name while adding a short descriptor to the end to distinguish each product in the family. Ultimately this makes a lot of sense because the services share resources. Here is how things break down:

LoopLink® RLC

Our flagship service, LoopLink® RLC is designed for the Residential and Light Commercial geothermal design market. It is a powerful web-based software service that helps system designers size loopfields and do advanced economic analysis for homes and office spaces.

It is built specifically for designing ground heat exchangers for buildings with low occupancy schedules, negligible internal gains and low to moderate ventilation requirements. Basically, anything you can reasonably model using ACCA Manual J.

LoopLink® PRO

LoopLink® PRO is also a web-based ground loop design service but it is specifically designed to handle commercial building loads. PRO is built to be extremely flexible and handle designs that range in complexity from a simple block load all the way out to campus systems with each building broken into individual zones.

Buildings requiring detailed load analysis with tools like eQuest or TRANE Trace are what we designed PRO to handle.

LoopLink® GSE

LoopLink® GSE is our geothermal savings estimation service. It allows companies large and small to access a powerful performance estimation engine without having to maintain their own estimation models. Subscribers to the service build their own interfaces and submit data including location, square footage and a few other variables. GSE looks up the location, figures out the typical local weather and estimates the energy and cost of heating and cooling the space with geothermal vs. a traditional comfort system.

LoopLink RLC or LoopLink PRO: Which Is Right For You?

Monday, August 10, 2015

We make web-based ground loop design software, and we are very proud to now say that we have two products in our arsenal:

Both have their place. With the recent addition of LoopLink PRO to our offering, we're now being asked about when it's appropriate to use one over the other. Given the fact that heat transfer in the ground is the same in a residential system as a commercial, which one do you need for a given application?

Even though PRO can be used to design a system of any size and scope (residential or commercial), RLC will make life much easier for the residential designer. This article will help you decide which is better-suited to meet your needs.

What is a “residential” system?

Generally speaking, you can use “residential” ground loop design software on any building where its heating and cooling loads are closely tied to weather conditions. In such a system, there is minimal need for consideration of how the building is being occupied or used. There aren't large amounts of internal gains, occupancy rates, ventilation requirements, industrial processes, etc.

Examples Include:

  • Any size home, no matter if it is large or small
  • Multifamily residential buildings such as apartments or condos
  • A large warehouse or storage building with little to no internal gains
  • Small office buildings with light occupancy schedules and minimal fresh air requirements

The simple relationship of load to outside air temperature can be used to develop a load profile graph, like this one:

Once the building load profile is generated, it is also a straightforward process to determine how much a heat pump will have to run, how efficient it will be, how much it will cost to operate, how much will required of the ground loop, etc. Because of the predictable behavior of a residential building, RLC can use a small amount of information (peak heating and cooling loads along with project location) and use it to perform a full-fledged energy analysis. It doesn't really matter how big the system is. As long as there is a linear relationship between the building loads and the outside air temperature, the bin method can be used to predict how much heating or cooling will be required.

What is a "commercial" system

For a commercial building, the energy modeling process is quite a bit more involved. The heating and cooling load profile depends on how the building is being used rather than the weather conditions. For example, a manufacturing facility, large office building, or data center would very likely need cooling even when the outdoor air temperature is 40°F. This is a stark contrast to a “residential” application that would definitely need to be heated to maintain thermostat set point at the same temperature. A load profile for a commercial building could look something like this:

As you can see in the graph, some cooling is required even during the cold winter months. To accurately determine the heating and cooling requirements for a commercial building, you need to consider:

  • Occupancy (number of people)
  • Occupant activity levels (exercising vs. sitting at a desk, etc.)
  • Ventilation (fresh air)
  • Light power density
  • Internal gains – amount and type depends on the building
    • Offices - computers, monitors, copiers, appliances, etc.
    • Manufacturing facilities - CNC machines, paint booth, welders, etc.
    • Restaurant – range, oven, coolers, etc.

Not only do you need to consider how much each process or component will contribute to the heating and cooling requirements for a building, but you also need to consider when each is used (e.g. – schedule). Attention to detail is critical for this time-consuming process.

There are many programs that are well-suited to model a commercial building. These programs use the hour-by-hour method rather than the bin method for the energy calculations. Here are a few examples:

A good portion of the heavy lifting (e.g. - the energy model) is done outside of ground loop design software. But by decoupling the energy model from the ground loop design calculations, you can analyze a much more complicated system. Each of the programs listed above will export the data in various formats. The outputs are the result of a lot of hard work but are condensed into a usable format that can be directly imported to PRO.

As previously mentioned, PRO could be used to design the ground loop for a residential system. However, it doesn’t perform energy modeling calculations so, you would need to obtain that information elsewhere. For a residential application, it would save a lot of time and effort to use LoopLink RLC for the design because it will perform the energy modeling calculations for you.

It’s all about the energy.

When trying to decide which program is for you, remember the key distinction between residential and commercial applications from a ground loop design standpoint. Ask yourself this question:

Can the heating and cooling requirements for a building be accurately predicted with weather data alone, or do you also need to know something about building usage and its schedule?

Once you’re able to answer, hopefully it will be easier to choose between LoopLink RLC and LoopLink PRO moving forward.

Attention IGSHPA Members

Tuesday, July 28, 2015

Geo-Connections is proud to announce that all active members of IGSHPA (International Ground Source Heat Pump Association) are now eligible to receive 20% off LoopLink RLC and LoopLink PRO subscriptions.

LoopLink PRO already supports the discount as part of the sign up process and through your account settings. A complete integration into our LoopLink RLC billing system will take us a little bit of time to complete but we didn’t want to wait to announce this fantastic new IGSHPA member benefit. Simply let us know that you are an IGSHPA member and we will apply the discount to your account after it is verified through IGSHPA.

This new member benefit offsets IGSHPA membership dues by as much as $120 per year per Geo-Connections software. So, if you work in just residential or just commercial loopfield design, your IGSHPA membership will only cost $5.00.year. If you work in both residential and commercial ground loop design, maintaining your IGSHPA membership now earns you up to $240/year in savings... so membership pays you back $115. The discount is good for as long as your IGSHPA membership is current and will apply to new and existing accounts.


You can learn more about LoopLink PRO features or sign up for a free one week trial of LoopLink PRO at looplinkpro.com

Geo-Connections: Looking Forward

Thursday, July 9, 2015

We are extremely happy to announce that LoopLink® PRO, our new commercial design software is now available to the public. With the release of LoopLink PRO, we are planning on some significant changes and improvements to all of the other areas of our business and we wanted to take a minute to share with you what we have planned as we look forward to the year ahead.

Updating All Websites

In the near term, we will be rolling out an updated design for our company site, LoopLink® RLC and the GeoConnected blog. Each site will have its own distinctive look but there will be common elements that will make accessing information across all of our sites faster and easier. As part of the redesign, we will improve the mobile friendliness of all of our web properties.

LoopLink RLC Updates

We have never hid the fact that we are a small team. While that size provides us some of our greatest strengths, it also gets in the way of us taking on some of the projects that we really want to get done. With LoopLink® PRO up and running (like a giant geothermal bull of awesomenessitude), we will be turning our focus back to our flagship residential/light commercial program and working through some pretty major changes. Including:

New Look and Feel

We will clean up the existing design and make the site more responsive for mobile users. Many of the design cues will be pulled from the LoopLink® PRO interface so if you are curious where we are headed, you should check out the PRO interface.

Server Side Power Up

We will be making some critical changes to the parts you don’t see that will help us to improve the parts you do much more efficiently moving forward.

Payment System Upgrade

We will be making significant changes to our check out process that will force changes in account management and will affect current users’ automatic renewal schedule. We will contact all users prior to taking this step with details about what to expect and how you will be impacted.

Headloss & The Upgrades

There are a lot of users who have requested the inclusion of a head loss calculator into LoopLink® RLC. It will be added this year. In addition we have a few other upgrades and tweaks on our to-do list to tackle. We will determine the short list soon and fill you in on the details.

Training Opportunities

Our roots have always been in education. Over the past year, we have worked hard to expand and improve upon our online courses for geothermal professionals. With the help of our friends at HeatSpring we are proud to offer the following courses.

Entry Level Geothermal Professional

Provides a basic overview of GSHP design, installation, etc. for those looking to learn without the need for certification.

Geothermal Designer Boot Camp + LoopLink Certification

For the residential or light-commercial system designer looking to learn advanced design principles. This course provides hands-on design experience through homework problems that are completed using LoopLink. Get a free LoopLink RLC license when you register.

IGSHPA Geothermal Installer Accreditation

For anyone looking to open themselves to new markets through a working knowledge of GSHP technology . This is a preparation course for the IGSHPA Accredited Installer exam and covers all aspects of GSHP systems - economics, design, installation and commissioning.

IGSHPA Vertical Loop Installer Accreditation

For drilling professionals interested in mastering GSHP installations. This is a preparation course for the IGSHPA Accredited Vertical Loop Installer exam and covers all aspects of GSHP systems - economics, design, installation and commissioning.

IGSHPA Certified GeoExchange Designer (CGD)

For the commercial system designer looking to obtain the highest certification available in the world of GSHPs. This is a preparation course for the IGSHPA CGD exam and provides hands-on design experience through homework problems that are completed using LoopLink PRO. Get a free LoopLink PRO license when you register.

Thank you for your patience while we make these changes.


You can learn more about LoopLink PRO features or sign up for a free one week trial of LoopLink PRO at looplinkpro.com

LoopLink Update

Wednesday, July 16, 2014

Just when you thought LoopLink couldn't get any better... it does.

Formation Properties Estimators

Regardless of the type of ground heat exchanger design you are working on, you have to provide some information about the thermal properties of the ground. For many users, selecting a representative formation thermal conductivity and/or formation thermal diffusivity has been a stumbling block. The tables can be a little intimidating (especially for horizontal trench) and soil/rock is just something many people don’t know that much about.

In our latest update, we added tools to help estimate the thermal properties of the ground customized to the needs of the type of ground heat exchanger you are designing.

Vertically & Horizontally Bored

In vertically or horizontally bored GHEX, the formation thermal properties are a weighted average of each layer of soil/rock through which the bore passes. You can now create a drill log for either of these types of systems and LoopLink will automatically calculate and report the estimated thermal properties of the formation.

The drill log you define can also be saved and included as part of your printed reports.

Horizontally Trenched

There is a lot going on in the soil table for horizontally trenched ghex and it is intimidating especially for the uninitiated. So, we took some time and thought about how the table is read by a person and created an interactive tool to guide you through the selection process.

Now you just need to specify, the density and moisture range for your formation as well as the basic composition of the soil by percentage of sand, silt, and clay. LoopLink will narrow down your options and make suggestions for the closest 1-3 soils from the table.

Once you make your selection, click ‘Apply Estimated Soil Properties’ and the thermal conductivity and diffusivity will be updated for your design.

It is important to note that these new tools are just providing estimates. Even with a drill log defined, you can still directly set your thermal properties. Which you should do if you have actual formation thermal conductivity test results.

Video Help

Help files are awesome but sometimes we don’t feel like reading either so, we started making help videos. We don’t have them for every section just yet but you will notice a new play button popping up next to the help link in the sections where videos are available.

These are made more for first timers than our old pros but if you get stuck, they can give you a nudge in the right direction. Like everything else in a well maintained system, these are a work in progress and we will continue to add new content and improve over time.

Log In From Any LoopLink Domain

This new feature is something that users of our manufacturer versions will appreciate most. Have you ever Googled ‘LoopLink’, gone to looplinkrlc.com and been told that your log in information is invalid but you KNOW it is right?

Often times, your log in information is correct but, you are on the wrong website. This happens a lot more often than we thought it would when we started building the manufacturer versions so we changed our approach to logging in a little bit.

Now, if you are using good information on the wrong site, we will provide you with a link to the correct site. For a bunch of reasons that are too boring to detail, we don’t log you in automatically but, we now direct you to where you need to be to log in to your account.

Bug Fixes

We do a lot of testing and try to be careful before any release but sometimes it takes pushing our work into the wild to find problems. There were a couple of noteworthy bug fixes that we completed in this release.

  • You may now include special characters like é,ô,à,ü,° in the text fields of LoopLink without crashing the report system. We unfortunately can’t support all character encodings. LoopLink will do its best to include these characters in your reports but if the character cannot be reproduced, it will be skipped and your report will still be generated.
  • Our explorations into character encodings made it possible for us to switch units of ft^2 in reports to the much cleaner looking ft2… not really an error but it was something that bugged our report designer.
  • The ‘% Energy From Geo’ calculation has been corrected for systems that use non-electric supplemental or dual fuel technologies. This issue had no impact on design calculations so critical values like bore lengths, operating costs etc. were unaffected by the error and the subsequent correction.

Is It REALLY Undersized?

Friday, March 28, 2014


In our article Warning: Graphic Geothermal Content we explained how to read and use the then new ‘Zone Load and Operating Profile Graph’ for design and sales. At the end of the article we made note of the fact that understanding the distribution of energy as a percentage of bin hours within an operating mode was the tricky part for many new designers and homeowners.

During equipment selection designers tend to fix on the % Sizing. % Sizing is important but it doesn’t tell the whole story. It simply expresses the equipment’s rated capacity as a percentage of the worst case peak heating load. It is a snapshot that doesn’t consider that there are very few hours in a year where the equipment will need to satisfy peak load requirements. Which begs the question, how do you really tell if equipment is undersized?

In his latest stroke of insight Ryan said: ‘Calculate the percentage of the total energy that is provided by the geothermal and display that directly below the heat pump’s percent sizing value.’

Seems obvious now... so we added the output "% Energy From Geothermal" to the zone pages and reports directly below '% Sizing'.

How Does This Help?

Well, now when you are selecting a heat pump that is ‘undersized’ for a space you can see that even though your equipment is sized to 75-80% based on capacity, the geothermal system may in fact supply 95-99% of the total heating energy required by the system. This makes it even easier for you to optimize your heat pump selections during the design. Plus, it gives you a quick way to explain to your customers why it is ok that the equipment you selected is ‘undersized’.

Think of it as a shortcut to explaining the bin hours on the ‘Zone Load and Operating Profile Graph’, which, in our humble opinion, is still one of the most useful graphical tools for understanding and explaining geothermal system operation.

Don’t Forget Operating/Installation Costs

It should be noted that just because the selected equipment is well matched to the space requirements, it doesn’t necessarily mean that it will be the cheapest to operate or install. Play around with combinations of multiple smaller units versus a single larger unit. What you find might surprise you.

Shorter But Dominant?

Friday, October 25, 2013

For every geothermal ground loop design, there is a load dominant mode and a length dominant mode. The load dominant mode is the one that will transfer the largest amount of energy to/from the loopfield while the length dominant mode is the one which requires the largest amount of pipe in the ground to transfer that energy based on designer specified entering water temperatures. Most of the time, they are the same, but not always.

When the temperature of the fluid entering the heat pump and the deep earth temperature (DET) get closer together, the amount of pipe needed to transfer heat increases. So, in some system designs, it is possible that the load dominant mode will require shorter loop lengths.

In our latest update we have made it clearer when there is a difference between load dominance and length dominance in a design. On screen, we independently flag the load dominant and length dominant modes when they are different. And, in the reports, your dominance flags have been reworded for clarity.


For those that are really paying attention, fixed length mode works the same as it ever did and only considers load dominance. The reason for this is that Fixed Length Mode is a reverse calculation of EWTs and without adding an obscene amount of overhead (not to mention a false sense of accuracy), it isn’t always possible to obtain exactly equal heating and cooling lengths. So, even when the load dominant mode’s length is shorter, it is assumed that either fixed length mode did not converge on a real solution (which LoopLink flags as an error) or the difference between the two lengths is insignificant with respect to installed performance.

Geothermal Designers Earn A "F"

Thursday, September 5, 2013


Out of 5000 designers directly invited, we had 42 attempt to Prove Carda Wrong in our challenge but only 5 were able to answer correctly. That is a solid B+ going to Carda but a very disappointing F going to the geothermal designers. As informal polling goes, that is pretty strong evidence that there is room for improvement or at least a need for a refresher course when it comes to the fundamentals of geothermal system design.

Our last post 95% Of All Zones Are Designed Inaccurately was titled and written with a heavy hand. It was a marketing piece first and an informational article second. The truth is that the overall impact of properly calculated correction factors will not make or break a system design unless that system is operating under some very unusual conditions.

Understanding why that is true and when correction factors should be calculated, are important skills for every geothermal system designer.

Food For Thought

3% of LoopLink users have designed 16% of all the projects, 26% of all the zones and 30% of the total installed capacity on LoopLink's servers. In other words, 3% of our users:

  • Design more projects than anyone else.
  • Design larger projects than anyone else.
  • Are LoopLink Certified.

We aren't going to take credit for the success of these individuals but we will say that the most successful among us, are always those that challenge themselves to learn more.

Improve Yourself To Maintain The Health Of The Industry

We of course have an interest in getting more people to get trained, we are in business to make money, but our motivation is more than just short term profits (read our training mission). It is crucially important for the success of the geothermal industry that all installations are designed professionally and optimized to offer the shortest return on investment with the best long term performance. One bad system can ruin an entire market. Negative word of mouth spreads faster than wildfire especially when the source is a homeowner burned after investing top dollar in a comfort system.

If you are among the 37 designers brave enough to try and fail, we have no doubt that you can Prove Carda Wrong. We will honor the $200 discount offer you earned for the rest of this year because we really do want you to take this opportunity to improve yourself and your business. Call us before you enroll (866-995-4449) and we will make sure you get the discount.

If you prefer the lone wolf approach to things, the science and methods behind everything we train is covered, in detail, in the IGSHPA RLC Manual. We are happy to field any questions you may have as you work through it.